
Creating an IBM MQ Queue Manager from scratch
This guide gives an example of how to create a queue manager configuration and deploy it to create a queue manager on a target. It does not explain all of the permutations for queue managers, these can be gleaned from a combination of fully understanding this example and using the task reference and template help within the product. By the end of this guide you will have created a queue manager called QMGRD1 (representing a Development instance of a queue manager). Further guides may build on this example.
The following steps need to be completed:
- Create an IBM MQ RapidDeploy project (pre-requisite).
- Create a Target for this project.
- Specify the logical names for the RapidDeploy objects.
- Configure the Server object to connect to your target.
- Create a Deployment Package.
- Execute a deployment.
Create a Target for QMGRD1
- Assuming that you have created an IBM MQ project, navigate to the "Targets" tab.
- Click on "New Target".
- Enter appropriate values for your Server, Installation and Configuration. The key values are the Server and the Installation, it is recommended that this reflects your queue manager name, the remainder field is logical and could be used to assist with your sorting of different environment configurations.
- Click on the "Next" button and fill in the necessary data dictionary items for all of the specific configuration that the queue manager requires.
- Click on the "Next" button and click on "Create" to save the new target.
Configure the Server object
The new target creates a number of RapidDeploy objects, chief of which is the target server which needs configuring to successfully connect.
- Configure the Server to use one of the supplied transports (e.g. SSH or Remoting agent). Once done, ensure that the connection is successful by testing and also ensure you are using a user with the appropriate privileges.
- In addition to the Server object, you will also have created an Installation which can also be configured. To do so:
- Navigate to Infrastructure, select the recently created Server, go to the Installations tab, and select the just created Installation, for instance, QMGRD1.
- Set the Owner field to "mvadmin" and fill in any other configuration required (e.g. the "Snapshots Path").
- And save the Installation.
Create a Deployment Package
- Within the Project configuration panel, navigate to the Packages tab.
- Click on the "Create Package" button to create an auto incremental version named package.
- Alternatively, use the "Add Package Wizard" button to create a Deployment Package for this project. Note the name must contain the Search String set in the Artifact Repository tab.
Perform a Deployment
- Navigate to Jobs > New Job Plan.
- Double click on the "(empty)" blue box.
- Select the Project, the Target and the Deployment Package created previously, and click on "Apply".
- Click on the "Run" button, and after the job has finished the queue manager will be created on the specified target.
Creating a Queue Manager in IBM MQ on a remote Windows server - step by step tutorial (RapidDeploy 3)
- Create a RapidDeploy project (code deploy) and as a Product choose the WMQ plugin.
- In the Environment tab select a Server if it already exists (it should be the same Server you used when you performed the IBM MQ installation) and at the beginning set a new name for the Environment (you will configure it later).
- Go to the Environment and specify the Owner, the Binary Path and tne Display Name.
- Go to the Product tab in the Environment panel and specify the name of a new Queue Manager, the hostname (can be "localhost"), the port, and the channel.

Environment configuration - The rest of the fields cand be left with default values.
- Go back to your RapidDeploy project, to the Orchestration tab, and add a new "IBM MQ Default Manage Queue Manager" task.
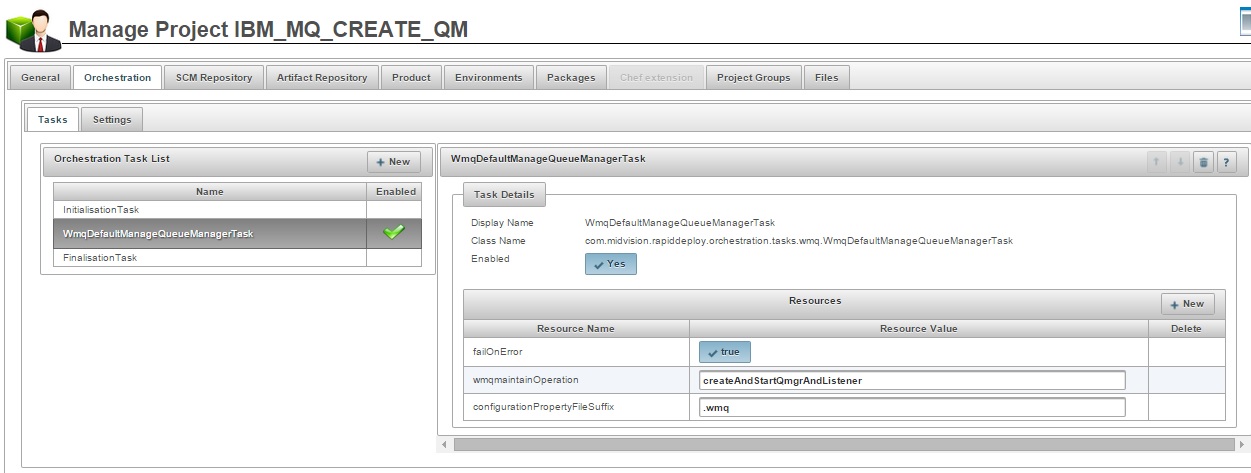
Orchestration tab qm - Now if you run the deployment you will have an error because the "wmq.qmgr.names" property is not specified. Navigate to the Environment tab in the Project panel, then click Edit, find the Environment Configuration, and add the follogin properties: wmq.qmgr.names, wmq.qmgr.TestQM1.createqmgr, wmq.qmgr.TestQM1.connection and wmq.qmgr.TestQM1.version.

Project env - Now everything is ready, so you just need to create a new Deployment Package and run the deployment.
- When it is finished successfully you can check the status of the newly created Queue Manager by running the "dspmq" command on your remote server.