
Deploying configuration and code to an IBM MQ Queue Manager
Overview
This guide gives an insight into how with a configuration representing your MQ target(s) you can systematically and securely deploy configuration to the queue manager. Some concepts are discussed at a high level to give an insight into the possibilities but a simple example is used in this instance.
Prerequisites
Before you start this guide it is assumed you have performed the following tasks:
- Create an "IBM_MQ_DEPLOY" project that has at least the "IBM MQ Deployment" task in the orchestration.
- Create a Target configuration that represents the queue manager topology you wish to deploy (this will be discussed in more detail below).
- Create an MQSC script to create and manage objects for your queue manager.
- Configure the Server object and the Installation object with details of your target host and queue manager.
Structure of an IBM MQ project configuration
The IBM MQ plugin is used to manage the configuration of queue managers. As described in the best practices documentation it is intended that the plugin be used to manage your queue manager instance in all of its environments from DEV to PRODUCTION. This is achieved by means of using a template MQSC script for your queue manager. This template is a genericised form of your queue manager and as such is tokenized with values that are intended to be replaced (using the corresponding data dictionary) at deploy time.
The topology of a MQ configuration is represented in source control (or on local file system) within the project directory structure. A typical structure is reflected below. Showing Directories (D) and Files (f):
(D) IBM_MQ_DEPLOY
(f)   classpath.xml
(f)   data-dictionary.xml
(f)   log4j.properties
(f)   midvision-deploy-orchestration.xml
(f)   packages-info.xml
(f)   resource.xml
(D)   wmq
(D)     config
(f)       config.properties
(D)     mqsc
(D)       <rootFolder>
(D)         <folderToInclude1>
(f)           template.mqsc
(D)         <folderToInclude2>
(f)           custom.mqsc
It should be noted that this structure is very flexible. One of the dictionary variables for running MQSC into your target queue manager is @@FOLDERS_TO_INCLUDE@@ which enables you to specify different script locations for different environments. This allows you to run a generic template script (which could be called anything) and optionally if your dictionary has specified the folder any custom scripts that may only apply to this single instance of a queue manager. Indeed this structure could allow you to maintain an MQSC script for each queue manager in your estate should you wish that overhead.
A pattern shown below would allow you to maintain a single MQSC script for all the queue managers of the form QMGR_1 (e.g. DEV_QMGR, QA_QMGR, PROD_QMGR). The template MQSC script would be tokenized to remove all environmental differences from the file and place them in the corresponding data dictionary entry representing that environment. For example, all channel names, hostnames, port numbers, cluster repositories and listener names could all be tokenized.
wmq
  config
    config.properties
  mqsc
    <MASTER>
      <QMGR_1>
        template.mqsc
Project configuration files
The configuration file contains the template configuration properties while the data dictionary file has the specific values for each target (Server.Installation.Configurtion) you have defined.
Configuration properties file
- This is a key/value file for the queue manager in question. It can be tokenized to use data dictionary values if required. The properties contained in this file are all the required parameters to create and configure a queue manager (e.g. log file sizes, binary installation location, logging type, etc.).
- Below is an example of a generic configuration file which would suit the structure above:
wmq.qmgr.names=@@QMGR_NAME@@

wmq.qmgr.@@QMGR_NAME@@.createqmgr=true
wmq.qmgr.@@QMGR_NAME@@.name=@@QMGR_NAME@@
wmq.qmgr.@@QMGR_NAME@@.connection=@@QMGR_NAME@@:@@QMGR_HOST@@:@@QMGR_PORT@@:@@QMQR_CHANNEL@@
wmq.qmgr.@@QMGR_NAME@@.deploymentmode=@@QMGR_DEPLOYMENT_MODE@@
wmq.qmgr.@@QMGR_NAME@@.os=@@QMGR_TARGET_OS@@
wmq.qmgr.@@QMGR_NAME@@.version=@@IBM_MQ_VERSION@@
wmq.qmgr.@@QMGR_NAME@@.rootfolder=@@ROOT_FOLDER@@
wmq.qmgr.@@QMGR_NAME@@.folderstoinclude=@@FOLDERS_TO_INCLUDE@@
wmq.qmgr.@@QMGR_NAME@@.description=@@QMGR_DESCRIPTION@@
wmq.qmgr.@@QMGR_NAME@@.logging=@@QMGR_LOGGING@@
wmq.qmgr.@@QMGR_NAME@@.logfilesize=@@QMGR_LOGFILE_PAGESIZE@@
wmq.qmgr.@@QMGR_NAME@@.primarylogs=@@QMGR_PRIMARY_LOG_FILES@@
wmq.qmgr.@@QMGR_NAME@@.secondarylogs=@@QMGR_SECONDARY_LOG_FILES@@
wmq.qmgr.@@QMGR_NAME@@.defaultxmitqueue=@@QMGR_NAME@@.DEFXMITQ
wmq.qmgr.@@QMGR_NAME@@.listener=@@QMGR_NAME@@_LISTENER.TCP
wmq.qmgr.@@QMGR_NAME@@.datapath=/MQHA/@@QMGR_NAME@@/data
wmq.qmgr.@@QMGR_NAME@@.logpath=/MQHA/@@QMGR_NAME@@/log
wmq.qmgr.@@QMGR_NAME@@.binaryinstalllocation=@@IBM_MQ_BINARY_INSTALL@@
- Find more information about the available properties that can be set in this file here.
Data dictionary file
- This is an XML file that contains all the created targets and the data dictionary values for each of them. A data dictionary can be used to replace parameters in any non-binary file within the deployment package.
- It is extremely NOT recommended to modify this file manually but using the web console instead.
- Below is an examples of a data dictionary XML file:
<?xml version="1.0" encoding="UTF-8"?><dataDictionary>
    <project>IBM_MQ_DEPLOY</project>
    <target>devServer.mq9.DEV_QMGR</target>
    <target>qaServer.mq9.QA_QMGR</target>
    <target>prodServer.mq9.PROD_QMGR</target>
    ...
    <entry>
        <key>@@QMGR_NAME@@</key>
        <value>Default_QMGR</value>
        <helpText/>
        <type>0</type>
        <encrypted>false</encrypted>
        <external>false</external>
        <resource>
            <id>devServer.mq9.DEV_QMGR</id>
            <value>DEV_QMGR</value>
            <external>false</external>
        </resource>
        <resource>
            <id>qaServer.mq9.QA_QMGR</id>
            <value>QA_QMGR</value>
            <external>false</external>
        </resource>
        <resource>
            <id>prodServer.mq9.PROD_QMGR</id>
            <value>PROD_QMGR</value>
            <external>false</external>
        </resource>
    </entry>
    <entry>
        <key>@@QMGR_HOST@@</key>
        <value>localhost</value>
        <helpText/>
        <type>0</type>
        <encrypted>false</encrypted>
        <external>false</external>
        <resource>
            <id>devServer.mq9.DEV_QMGR</id>
            <value>development.qmgr.host</value>
            <external>false</external>
        </resource>
        <resource>
            <id>qaServer.mq9.QA_QMGR</id>
            <value>test.qmgr.host</value>
            <external>false</external>
        </resource>
        <resource>
            <id>prodServer.mq9.PROD_QMGR</id>
            <value>production.qmgr.host</value>
            <external>false</external>
        </resource>
    </entry>
    ...
</dataDictionary>
The template.mqsc file
Every queue manager would most likely have a template MQSC file to create the required MQ objects within that queue manager. Depending on the way you split your projects you may wish to create projects that create queue managers separate from those that deploy MQSC to them, but in the main some form of MQSC could apply even in that approach (e.g. setting up certain admin channels and default values for model queues).
The template provides a model for your queue manager. It is standard MQSC with various parts tokenised as per your requirements. An example of a template is shown below:
ALTER QMGR CHLAUTH(DISABLED)

def chl(@@QMGR_CHANNEL@@) chltype(svrconn) trptype(tcp) mcauser('mqm') replace

*** Maximum message size of 100Mb
    ALT QMGR MAXMSGL(@@QMGR_MAXMSGL@@)


*** Default Local Queue
    DEFINE QLOCAL('SYSTEM.DEFAULT.LOCAL.QUEUE') REPLACE  +
    DEFPSIST(YES)       +
    MAXDEPTH(5000)     +
    MAXMSGL(@@QMGR_MAXMSGL@@) +
    PROPCTL(FORCE)

*** Default Remote Queue
    DEFINE QREMOTE('SYSTEM.DEFAULT.REMOTE.QUEUE') REPLACE +
    DEFPSIST(YES)

*** Default Channel Definitions

*** Defaults for a server channel
    DEFINE CHANNEL(SYSTEM.DEF.SERVER) CHLTYPE(SVR) +
    TRPTYPE(TCP) +
    XMITQ(' ') +
    CONNAME(' ') +
    DISCINT(0) +
    MAXMSGL(@@QMGR_MAXMSGL@@) +
    REPLACE DESCR(' ') +
    NPMSPEED(NORMAL)

*** Defaults for a requester channel
    DEFINE CHANNEL(SYSTEM.DEF.REQUESTER) CHLTYPE(RQSTR) +
    TRPTYPE(TCP) +
    CONNAME(' ') +
    HBINT(60) +
    MAXMSGL(@@QMGR_MAXMSGL@@) +
    REPLACE DESCR(' ') +
    NPMSPEED(NORMAL)

*** Default Channel queues
    DEFINE QLOCAL('SYSTEM.CHANNEL.INITQ') REPLACE +
    DESCR('MQM Channel initiation queue')    +
    PUT(ENABLED)      +
    GET(ENABLED)      +
    DEFPSIST(NO)      +
    MAXDEPTH(1000)    +
    MAXMSGL(2000)     +
    NOSHARE           +
    DEFSOPT(EXCL)     +
    USAGE(NORMAL)     +
    TRIGTYPE(NONE)

*** Default Cluster Receiver Channel.
    DEFINE CHANNEL(SYSTEM.DEF.CLUSRCVR) CHLTYPE(CLUSRCVR) REPLACE +
    NPMSPEED(NORMAL) MAXMSGL(@@QMGR_MAXMSGL@@)

*** Default Cluster Sender Channel.
    DEF CHL(SYSTEM.DEF.CLUSSDR) CHLTYPE(CLUSSDR) REPLACE +
    NPMSPEED(NORMAL) MAXMSGL(@@QMGR_MAXMSGL@@)

*** Default Cluster Transimit Queue
    ALTER QL(SYSTEM.CLUSTER.TRANSMIT.QUEUE) MAXMSGL(@@QMGR_MAXMSGL@@)


*** Default Alias queues
    DEFINE QALIAS('SYSTEM.DEFAULT.ALIAS.QUEUE') REPLACE  +
    DESCR('MQM Alias Queue')    +
    PUT(ENABLED)      +
    GET(ENABLED)      +
    DEFPSIST(YES) +
    PROPCTL(FORCE)

*** Default Server Connection Channel.
    DEFINE CHANNEL(SYSTEM.DEF.SVRCONN) CHLTYPE(SVRCONN) REPLACE +
    MAXMSGL(@@QMGR_MAXMSGL@@)

*** Default Client Connection Channel.
    DEF CHL(SYSTEM.DEF.CLNTCONN) CHLTYPE(CLNTCONN) REPLACE +
    MAXMSGL(@@QMGR_MAXMSGL@@)
Deployment
Once you are comfortable with your environment configuration and MQSC template, the deployment is a simple matter of creating a Deployment Package and then deploying to the target:
- Navigate to the Packages tab in the Project configuration panel.
- Click on the "Create Package" button to create an auto incremental version named package.
- Alternatively, use the "Add Package Wizard" button to create a Deployment Package for this project. Note the name must contain the Search String set in the Artifact Repository tab.
To deploy the package:
- Navigate to Jobs > New Job Plan.
- Double click on the "(empty)" blue box.
- Select the Project, the Target and the Deployment Package created previously, and click on "Apply".
- Click on the "Run" button and accept the confirmation dialog.
- Progress can be viewed from the Running Jobs screen, further information can be displayed by clicking on the line entry in the table. Logs can be viewed by selecting the Console tab.
Step by step tutorial to create a sample RapidDeploy project (RapidDeploy 3)
- Create a RapidDeploy project (code deploy) and as a Product choose the WMQ plugin.
- In the Environment tab select the Server and Environment that you were using to create the Queue Manager.
- When your project is created edit it again, go to the Orchestration tab and add an "IBM MQ Deployment" task:
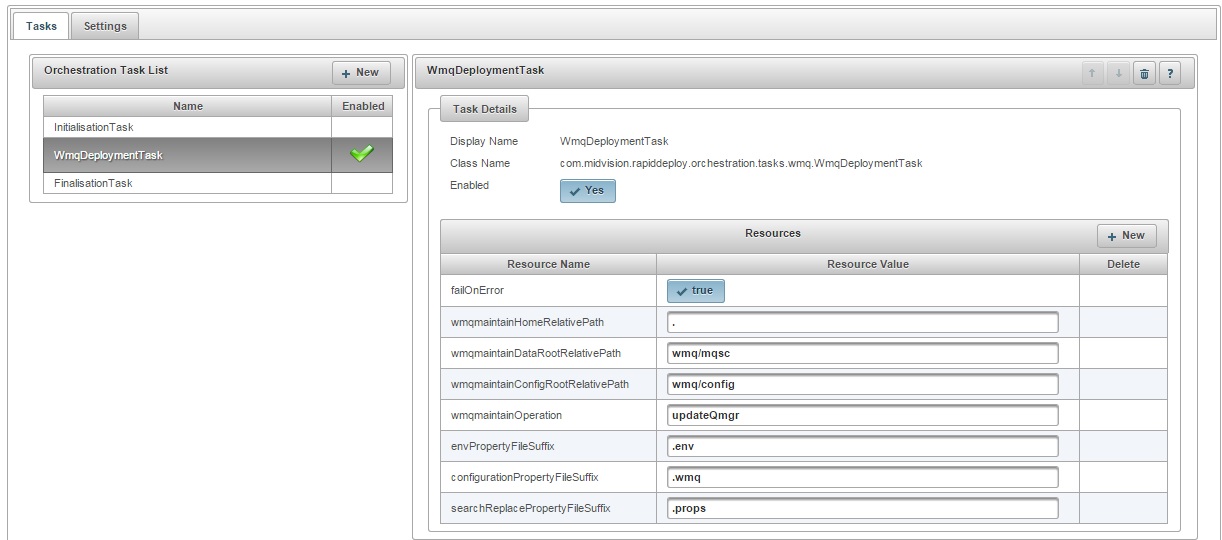
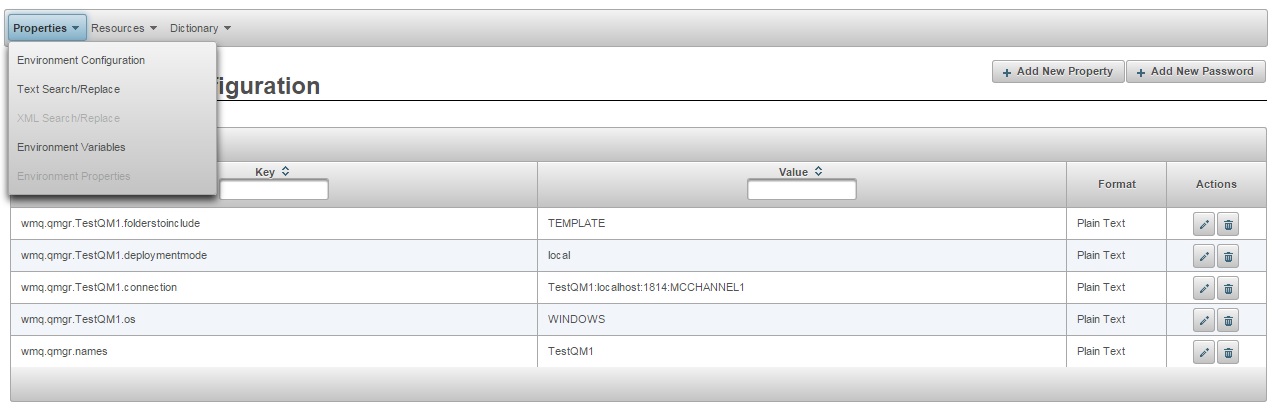
Orchestration tab - Now you need to specify new properties in the Environment Configuration (wmq.qmgr.names, wmq.qmgr.TestQM1.os, wmq.qmgr.TestQM1.connection, wmq.qmgr.TestQM1.deploymentmode and wmq.qmgr.TestQM1.folderstoinclude):
Environment configuration - Now everything is ready, so you just need to create a deployment package and run a new deployment.