
Creating your first project - Hello World
Introduction
This guide will take you through the steps to create a basic project, a target configuration and will conclude by creating a deployment package ready to deploy to a remote target. It is designed to show the basic steps required to create deployment orchestrations which is the fundamental process regardless of the technology being deployed. Key concepts will be explained throughout the document.
You will create a basic "Hello World" project which will execute an "echo" command and a directory listing on a remote target.
Create a Project
The core component of a RapidDeploy configuration is the Project. The Project dictates the WHAT aspect of the deployment steps - i.e. what are we going to do on the target, irrespective of where that target is. This is achieved by means of the project Orchestration. The Project also defines the structure and location of the Source of the deployment package, this could be a local file system or a Source Code Management (SCM) repository. Finally the Project dictates where the deployment package will reside, this could be a local file system or some form of artefact repository.
To create the Basic Hello World perform the following steps:
- Login to the framework server
In the left menu navigate to 'Resources' > 'Projects'
- Click the 'Add Project Wizard' button
You will be taken through a sequence of tabs, most of which will require some input.
Depending on your platform your values may differ from this guide.
However, use the table below which describes the tab and the suggests a value for you to use.
Basic Hello World Project
| Tab | Fields and Description | Suggested Value |
| General | Name: Project Name Description: Meaningful description to describe the purpose of the project Owner: Users with specific roles that can manage the project |
Name: BASIC_HELLO_WORLD Description: Simple project to demonstrate deployments Owner:mvadmin |
| SCM Repository | Select SCM Tool: Shipped with the tool are two SCM repository plugins. FileSystem and Subversion. Other SCM plugins are available for purchase which include Rational ClearCase and RationalTeamConcert. Depending on the selection other fields are revealed. For FileSystem just the Project root directory is required. This is the fully qualified path to the location in which you wish to store the project files. If the Subversion SCM plugin is selected then the Subversion repository location, username and password are required as well as the local working copy this is equivalent to the Project root directory) | SCM Tool:FileSystem Project Root Directory: MV_HOME/projects/BASIC_HELLO_WORLD |
| Artifact Repository | The purpose of this tab is to indicate where deployment packages should be stored. Typically this could be a buildstore directory. Shipped with the tool are two artifact plugins. FileSystem and Maven. Depending on which is chosen different fields are available. Both require a local location on disk,the Maven plugin however| Promotion Store: MV_HOME/promotionstore can synchronise that with a remote Maven repository. For FileSystem we specify a deployment package search string so the deployer can select the correct package from a list appropriate to this project. |
Artifact Repository: File System Build Store:MV_HOME/buildstore Deployment Package Search String: BASIC_HELLO_WORLD |
| File System | Specify folder where the deployments logs will be stored and select if you want to have initial package created and can be configured (location, user details) to build artifacts. | Log directory: MV_HOME/logs |
| Target | This panel allows you to create the basic set of resources required to perform deployments. Please read "Create a Target Configuration" to get more information | |
| Project Groups | This panel allows you to assign current project to existing project groups. | |
| Finish | Executes the project creation | Click the button |
Edit Project Orchestration
When a project is created an empty Orchestration is created. The orchestration an ordered set of tasks that the executed project will perform. Tasks are chosen from a panel of preconfigured orchestration tasks on the Orchestration tab.
To edit an orchestration follow the steps below
- Navigate to 'Resources' > 'Projects'
- Edit the BASIC_HELLO_WORLD project by clicking on the pencil icon
- Select the 'Orchestration' tab
You will note that the orchestration already contains the Initialisation and Finalisation tasks, these are mandatory for every project and cannot be removed.
To add a task simply click on the 'Add Task' button and locate the task within the pop up field. When you have located the task again, click on the '+' icon in the top right of the pop-up window. Note you can view details about the task including which parameters you might wish to set.
- 'Command and Script Execution' > 'Command Runner'
- 'File - Attributes' > 'Disk Space Check'
Add the tasks above as described by repeating the process for each task defined above. Note if you wish you can also change the name of the task by selecting the name, editing the field and clicking the tick.
You can make these tasks generic by replacing the hard coded values that are added by default with variables that will be replaced by their values contained in a dictionary file. To that end, configure the each of the tasks as shown below. Note the values used after each image, these can be pasted in. Save each task variable by clicking the 'tick' and once complete don't forget to Save the project.
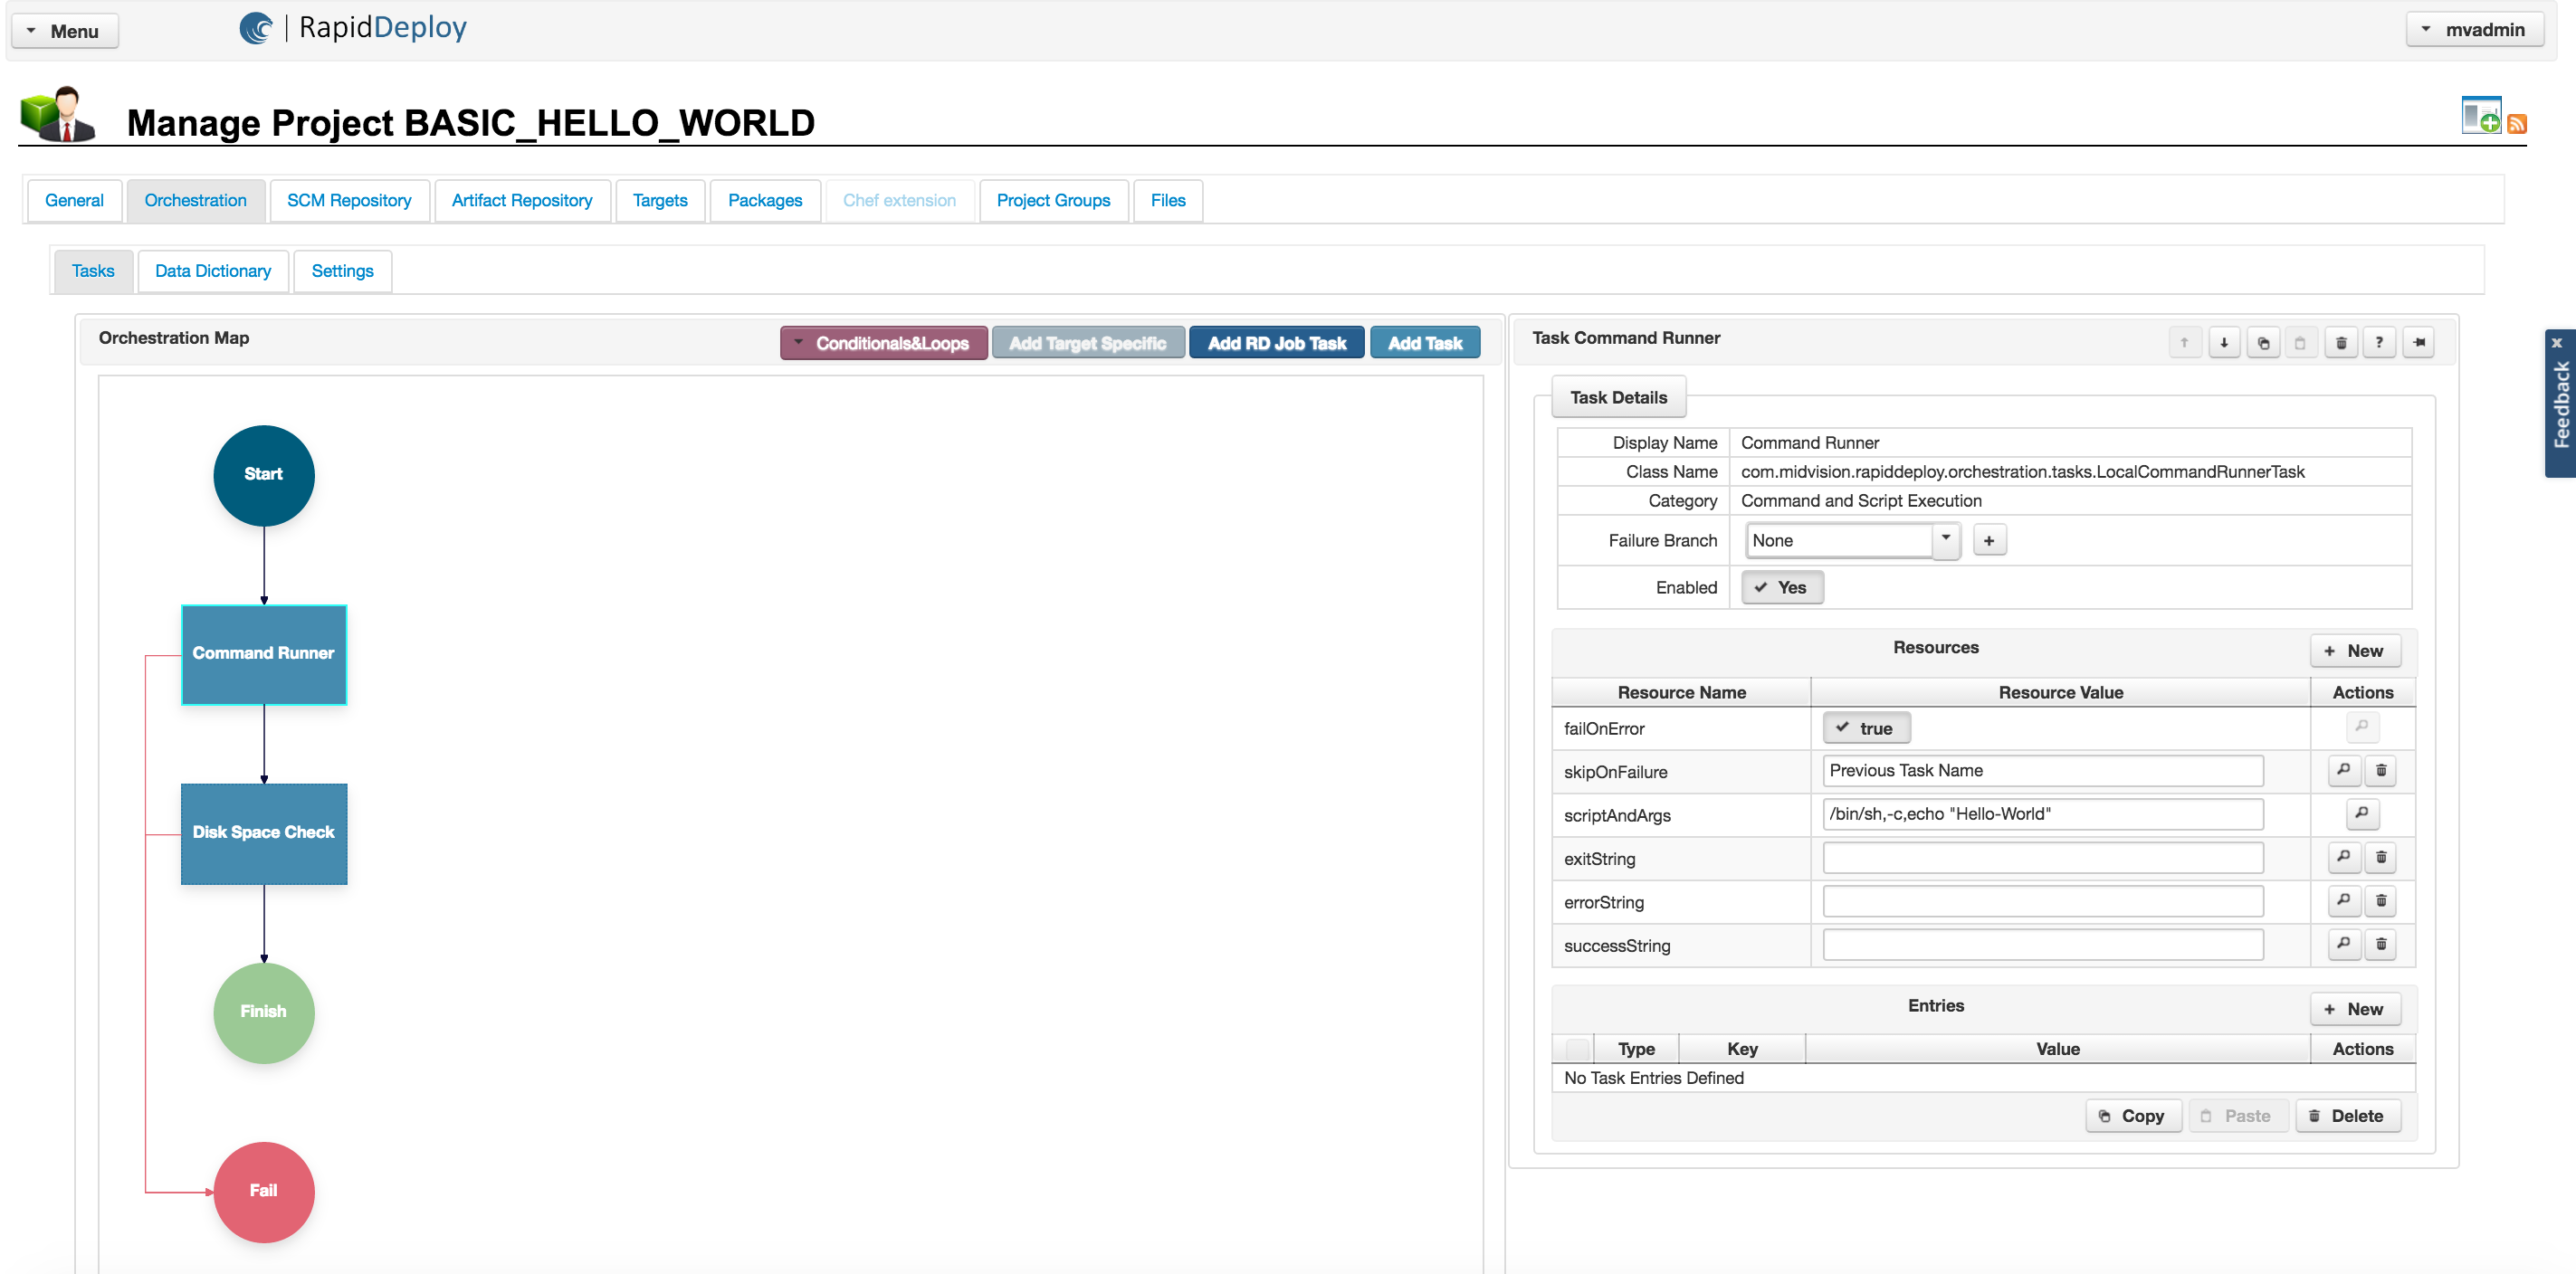
UNIX -> scriptAndArgs:/bin/sh,-c,echo "Hello-World"
WINDOWS -> scriptAndArgs:cmd,\c,echo "Hello-World"
exitString: Hello-World

requiredFreeSpace:1
UNIX -> directoryToCheck:/tmp
WINDOWS -> directoryToCheck:c:\temp
Create a Target Configuration
A target configuration is the WHERE aspect of a deployment. The configuration dictates where the deployment will occur and also allows you to specify any differences that the target location requires. For a basic project such as this the differences are contrived, but when deploying complex technologies such as Websphere Application Server it is very easy to understand why there maybe some differences in the configuration depending on the servers being deployed to (e.g. development environment on Windows, test environment on Unix etc).
A Target Configuration consists of the following components
- Server
- Installation
- Configuration
- To begin the process Open the BASIC_HELLO_WORLD project and navigate to the 'Targets' tab.
This panel allows you to create the basic set of resources required to perform deployments. The entire deployment principle is based on knowing 6 pieces of information.
Project - Indicates what type of technology is being deployed and where the source is located
Server - The target server to which the framework server connects to perform the deployment steps
Installation - A logical name which could be used to identify different installations on the same server (e.g Smoke testing, SIT Testing, Integration testing)
Configuration - A logical name to differentiate between different configurations using the same Installation
Deployment Package - The unit of deployment containing all of the necessary configuration to deploy to any pre-defined targets for the Project
- Click on the 'New Target' button
Enter values for the Server, Installation, Configuration fields and click the Create button
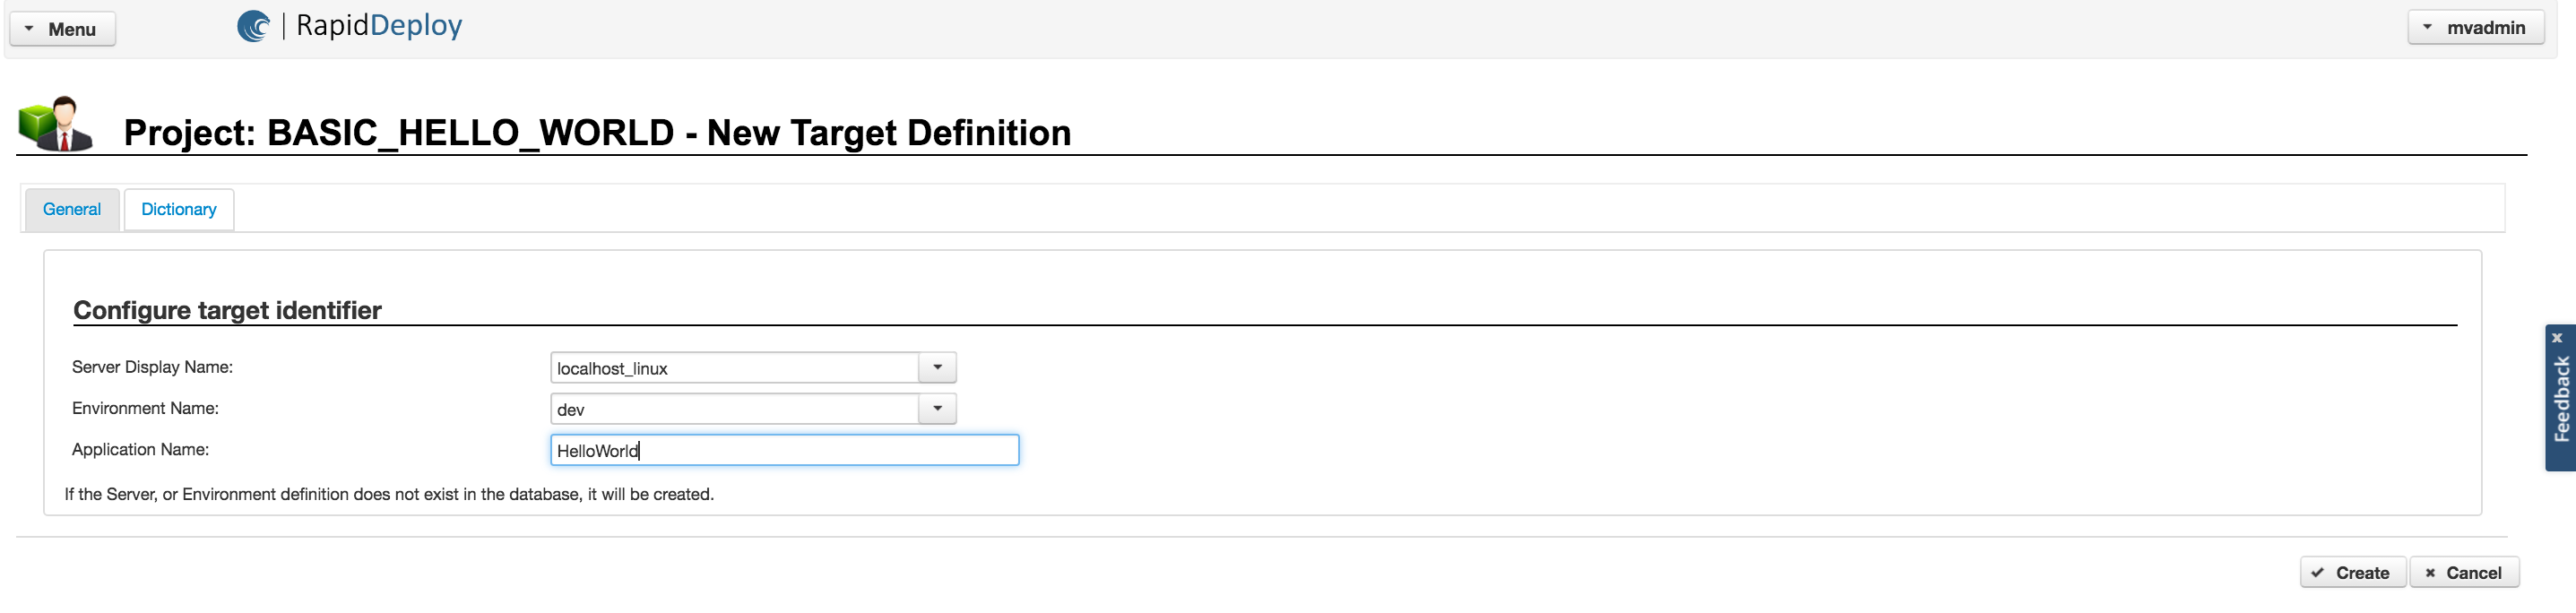
Creating the Installation This will create an entry in the Targets panel, it will also create the Server object which can be configured a little later.
- Create a Deployment Package
To create a deployment package simply enter the 'Package' tab in the Project. There is a button that will create a package using a standard name (based on the value used in the artifact tab). You can further customise a deployment package by using the 'Add Package Wizard' if you wish.
- Edit the server
In the newly created table entry in the 'Targets' panel hwserver01 is the name of the server which is a direct link to the Server object - click it.
Click 'Edit' if required to enter edit mode and set the following fields (you will also need to ensure the Build Store directory exists on your target). In the 'Transport' tab you will need to either choose Remoting or SSH plugins. Remoting requires that you set up the Remoting Agent as per these instructions. SSH of course assumes you have an ssh server running on the target (which is mostly the case for linux servers).
General Tab
| Display Name | hwserver01 |
| Hostname | localhost |
| Buildstore | MV_HOME/remotebuildstore |
| OS Type | Your OS Type |
| Version | Your OS Version |
| Allow Deployments | True |
| Connection Timeout (ms) | 200000 |
SSH Plugin
| SSH Enabled for deployments | True |
| SSH User Name | Username |
| SSH Password | Password |
Remoting Tab
| Agent Enabled for deployments | True |
| Remote Agent Port | 20000 |
| Agent Path | <blank> |
Test the connection works once you have configured a hostname and the transport by using the button provided. You should see the message below.
Test Success The test connection completed successfully.
Then Save the server object.
If the test was successful.
Once you have configured the server we can now perform a deployment. This is done as follows
- Navigate to 'Jobs' > 'New Job Plan'
- Select then double click on the '(empty)' project job which is preset by default.
- Select the BASIC_HELLO_WORLD project. Select the target and version and click 'Apply'.
- Click 'Run', add a summary note if required, then click ,,'Yes'>>
The deployment will now take place. The View Executing Jobs will be shown as below, and when complete the entry will disappear.
In general, progress against the tasks can be shown by clicking on the progress icon (Magnifying Glass), although this particular request will be too quick to process.
Success or Failure can be viewed by selecting Jobs > Previous Jobs.
Reviewing the log file (click the paper Icon) will show the tasks being executed sequentially and the output for each one. Summary
This very contrived example is designed to take you through the deployment steps for a very simple Orchestration in RapidDeploy. The steps themselves are the same irrespective of the technology being deployed. What does differ is the level of configuration, some technologies require very specific configuration. We will look further at this in the ADVANCED_HELLO_WORLD project and introduce the concepts of templates, dictionaries and promotion through environment levels.